


Una clase JTree permite mostrar datos de una forma jerárquica y en realidad este objeto no contiene sus datos; es decir, simplemente proporciona una vista hacia los datos consultando su modelo de datos.
A continuación se muestra como usar etiquetas HTML en un objeto Jtree para formatear los datos que este muestra. Para ser exactos, se debe personalizar la clase DefaultTreeCellRenderer extendiendo la misma para que la propiedad text acepte etiquetas HTML.
Paso 1.
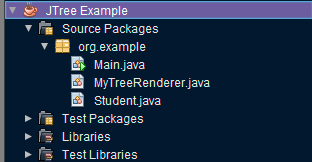
Crea un proyecto Java Application en Netbeans con el nombre de «JTree Example«. Agregar las clases:
Paso 2. Clase estudiante
Creamos una clase para contener la información que se vera en el JTree
package org.example;
/**
 * @see https://www.jc-mouse.net/
 * @author mouse
 */
public class Student {

    private String name;
    private String mail;

    public Student(String name, String mail) {
        this.name = name;
        this.mail = mail;
    }

    public Student() {
    }

    public String getName() {
        return name;
    }

    public void setName(String name) {
        this.name = name;
    }

    public String getMail() {
        return mail;
    }

    public void setMail(String mail) {
        this.mail = mail;
    }

}
Paso 3. Personalizar DefaultTreeCellRenderer
En esta clase es donde personalizamos los datos de salida, para este ejemplo, el nombre del estudiante se muestra en negrilla y su correo electronico en cursiva.
package org.example;

import java.awt.Component;
import javax.swing.JTree;
import javax.swing.tree.DefaultMutableTreeNode;
import javax.swing.tree.DefaultTreeCellRenderer;

/**
 * @see https://www.jc-mouse.net/
 * @author mouse
 */
public class MyTreeRenderer extends DefaultTreeCellRenderer {

    private static final String BOLD_FORMAT = "<span style='font-weight: bold;'>%s</span>";
    private static final String ITALIC_STYLE = "<span style='font-style: italic;'>%s</span>";

    @Override
    public Component getTreeCellRendererComponent(JTree tree, Object value,
            boolean sel, boolean expanded,
            boolean leaf, int row, boolean hasFocus) {
        super.getTreeCellRendererComponent(tree, value, sel, expanded, leaf, row, hasFocus);
        DefaultMutableTreeNode node = (DefaultMutableTreeNode) value;
        Object userObject = node.getUserObject();
        if (userObject instanceof Student) {
            Student student = (Student) userObject;
            String text = String.format(BOLD_FORMAT, student.getName());
            text += " " + String.format(ITALIC_STYLE, student.getMail());
            this.setText("<html>" + text + "</html>");
        }
        return this;
    }

}
Paso 4. Probando
Agregamos algunos datos en un Jtree y le asignamos nuestro renderer creado en el paso 3.
package org.example;

import java.awt.Dimension;
import javax.swing.JFrame;
import javax.swing.JScrollPane;
import javax.swing.JTree;
import javax.swing.tree.DefaultMutableTreeNode;

/**
 * @see https://www.jc-mouse.net/
 * @author mouse
 */
public class Main {

    /**
     * @param args the command line arguments
     */
    public static void main(String[] args) {

      DefaultMutableTreeNode root = new DefaultMutableTreeNode("Curso");

      DefaultMutableTreeNode student1 = new DefaultMutableTreeNode( new Student("Andres Trozado","andres_ito@mail.com") );
      DefaultMutableTreeNode student2 = new DefaultMutableTreeNode( new Student("Lola Mento","runlola@mail.com") );
      DefaultMutableTreeNode student3 = new DefaultMutableTreeNode( new Student("Elena Nito","xelchikito@mail.com") );
      DefaultMutableTreeNode student4 = new DefaultMutableTreeNode( new Student("Victor Tilla","viktor33@mail.com") );
      DefaultMutableTreeNode student5 = new DefaultMutableTreeNode( new Student("Paca Garte","del2@mail.com") );
      DefaultMutableTreeNode student6 = new DefaultMutableTreeNode( new Student("Estela Gartija","lagarto4ever@mail.com") );
      root.add(student1);
      root.add(student2);
      root.add(student3);
      root.add(student4);
      root.add(student5);
      root.add(student6);

      JTree jtree = new JTree(root);
      jtree.setCellRenderer(new MyTreeRenderer());

      JFrame frame = createFrame();
      frame.add(new JScrollPane(jtree));
      frame.setLocationRelativeTo(null);
      frame.setVisible(true);
    }

    private static JFrame createFrame() {
        JFrame frame = new JFrame("JTree Example");
        frame.setDefaultCloseOperation(JFrame.EXIT_ON_CLOSE);
        frame.setSize(new Dimension(400, 400));
        return frame;
    }

}
Ejecutamos el proyecto y tenemos:
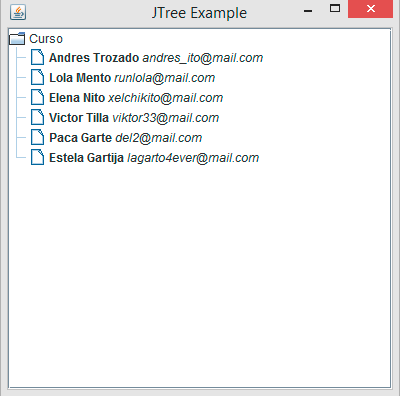
enjoy!


Los procedimientos almacenados no solo pueden retornar valores como números, cadenas, etc, sino también datos como los R[...]
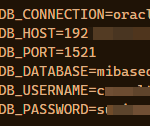
En esta ocasión aprenderemos a conectaros con una base de datos Oracle desde Laravel. Es un tutorial sencillo y cortito,[...]
Lenguaje: C# Nivel: Básico 1) Se desea desarrollar un programa que permita introducir una oración por teclado y contar l[...]
Este post es la continuación del tutorial «Generador de código para Netbeans« en donde vimos como crear un modulo para N[...]
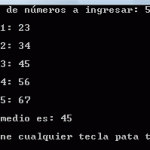
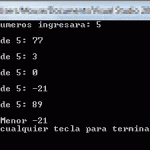
1. Dado N números enteros ingresados por teclado, determine el promedio de estos 01 static void Main(string[] args) 02 {[...]
Desarrolle un programa en consola con un menú para el usuario que permita agregar elementos a una pila, eliminar element[...]